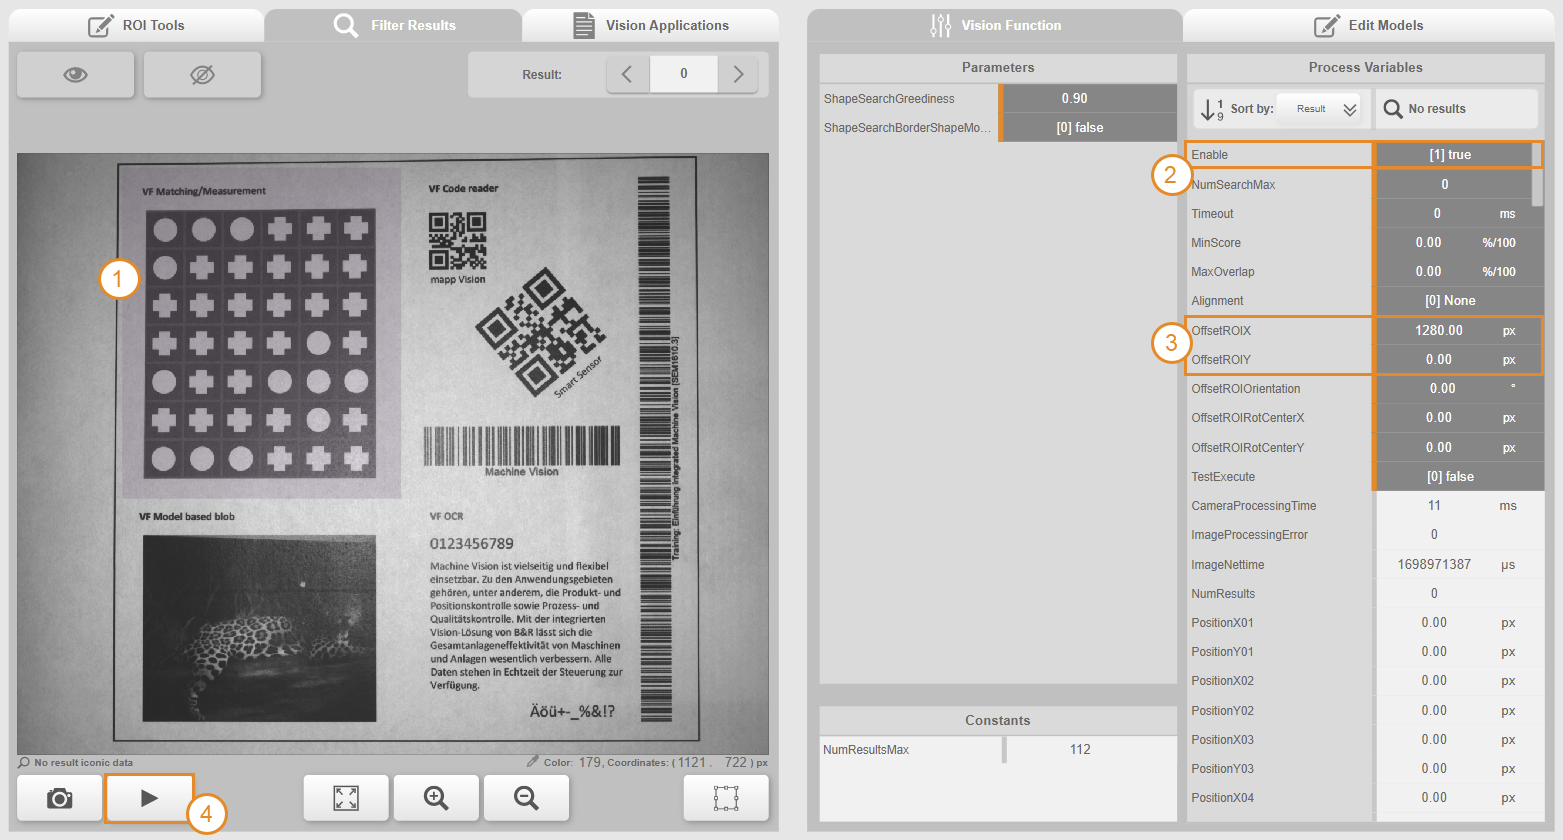
执行 ROI(感兴趣区域)定义了图像评估过程中要考虑的图像区域。只在该区域内搜索结果,从而加快评估速度。执行 ROI 是视觉功能的一部分(因此也是视觉应用程序的一部分),与模型和参数一样保存在 "数据集 "中。
执行 ROI 可通过 mapp Vision HMI 应用程序中的可用 ROI 工具进行配置。图像处理的总区域是各个加法和减法 ROI 工具区域的结果。应用配置的 ROI 工具后,生成的执行 ROI 区域将以透明的紫色突出显示。

图执行 ROI - 显示应用于摄像机的执行 ROI 区域
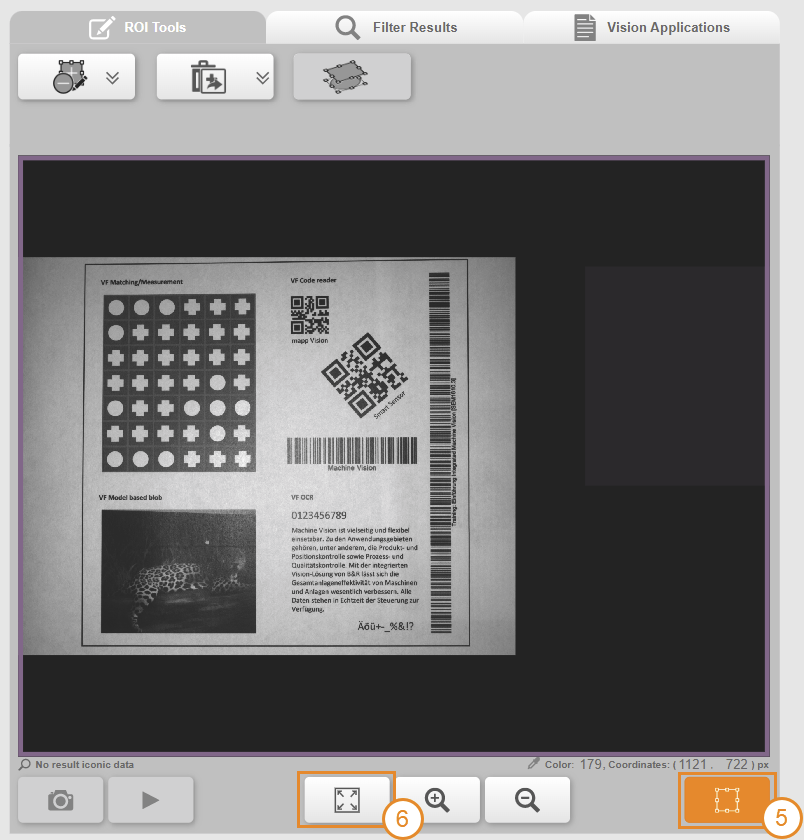
打开编辑模式并编辑执行 ROI
执行 ROI "的编辑模式仅在视觉功能中可用。
•在视觉功能的上下文中,这意味着
•在下拉菜单 "视觉功能 "中选择了视觉功能,而不是图像采集。
•在右侧主区域中,"Vision function(视觉功能)"选项卡处于活动状态,而不是 "Edit models(编辑模型)"。
执行 ROI "的编辑模式通过以下按钮打开:

信息:
没有正式的方法可以终止执行 ROI 的编辑过程。不过,执行 ROI 会存储在视觉应用程序中。因此,可以通过重新加载整个视觉应用程序来恢复已存储的执行 ROI。
•编辑 "执行 ROI "的步骤
•打开 "执行 ROI "的编辑模式。
•使用可用的 ROI 绘图工具添加或删除新的子区域。添加或减去几何图形、自由绘图、擦除等。
•使用减法工具时,还必须注意ROI 工具的应用顺序。
•退出编辑模式时,更改将发送并应用到摄像机。
•如果更改已成功应用,则会返回并显示新的执行 ROI。下次打开编辑模式时,可对其进行进一步编辑。
信息:
不包含单个 "正 "像素的 "执行 ROI "无效,无法应用。只有定义了有效的 ROI,才能退出编辑模式。
执行 ROI "是为相机拍摄的图像创建的。因此,在 "执行 ROI "编辑模式下,只能使用 ROI 绘图工具编辑实际图像区域。
但是,如果将视觉功能输入OffsetROIX和OffsetROIY设置为不等于 0 的值,"执行 ROI "层就会相对于图像移动。这样就可以编辑 "执行 ROI "层的新区域。但是,之前可以编辑的区域也将被锁定,无法进行编辑。当应用图像填充负 ROI 工具时,这也可能导致整个 "执行 ROI "区域不被擦除。
信息:
要删除整个已定义的 "执行 ROI "区域,可在选中该区域时使用相应下拉菜单中的 "删除 "选项。有关位置的信息,请参阅 ROI 工具。
在编辑模式下单击不包含 ROI 工具的曲面可选择现有的 "执行 ROI"。选中后,将在视场周围绘制一个框架。

•在图像外创建 "执行 ROI
•在图像区域内定义 "执行 ROI "区域,然后退出编辑模式。
•使用 "Enable(启用)"启用视觉功能。
•设置 "OffsetROIX "和 "OffsetROIY "的输入值以移动可编辑区域,例如在 x 方向上移动图像宽度的 1 倍。
•用 "执行 "将输入值传送到摄像机。
图移动 "执行 ROI "层,将图像区域以外的区域定义为 "执行 ROI "的一部分
•再次打开编辑模式,定义下一个 "执行 ROI "区域。
•图像中标记的按钮将图像上的视场和 "执行 ROI "编辑模式下的 "执行 ROI "区域居中。
图移动 "执行 ROI "区域后的视图
•现在可以将最初位于图像区域之外的部分区域定义为 "执行 ROI "的一部分。
•这些步骤可以根据需要多次重复。但需要注意的是,保存较大的 "执行 ROI "也需要摄像机和控制器的内存。
•要删除整个 "执行 ROI "区域,请选择该区域并使用 "删除 "按钮。
信息:
执行 ROI "作为视觉功能的一部分存储在视觉应用程序中,"执行 ROI "的数据大小与 "执行 ROI "所有区域周围的包围矩形的大小成正比。
如果在图像区域外定义了 "执行 ROI",则应注意尽可能紧凑地排列这些区域。
可用的 ROI 绘制工具和操作概览
选择单个像素的工具,请参阅像素 ROI。
•自由 ROI 绘制工具
•几何 ROI 绘图工具
•多个选定 ROI 绘图工具的命令
•调整大小
•调整角度
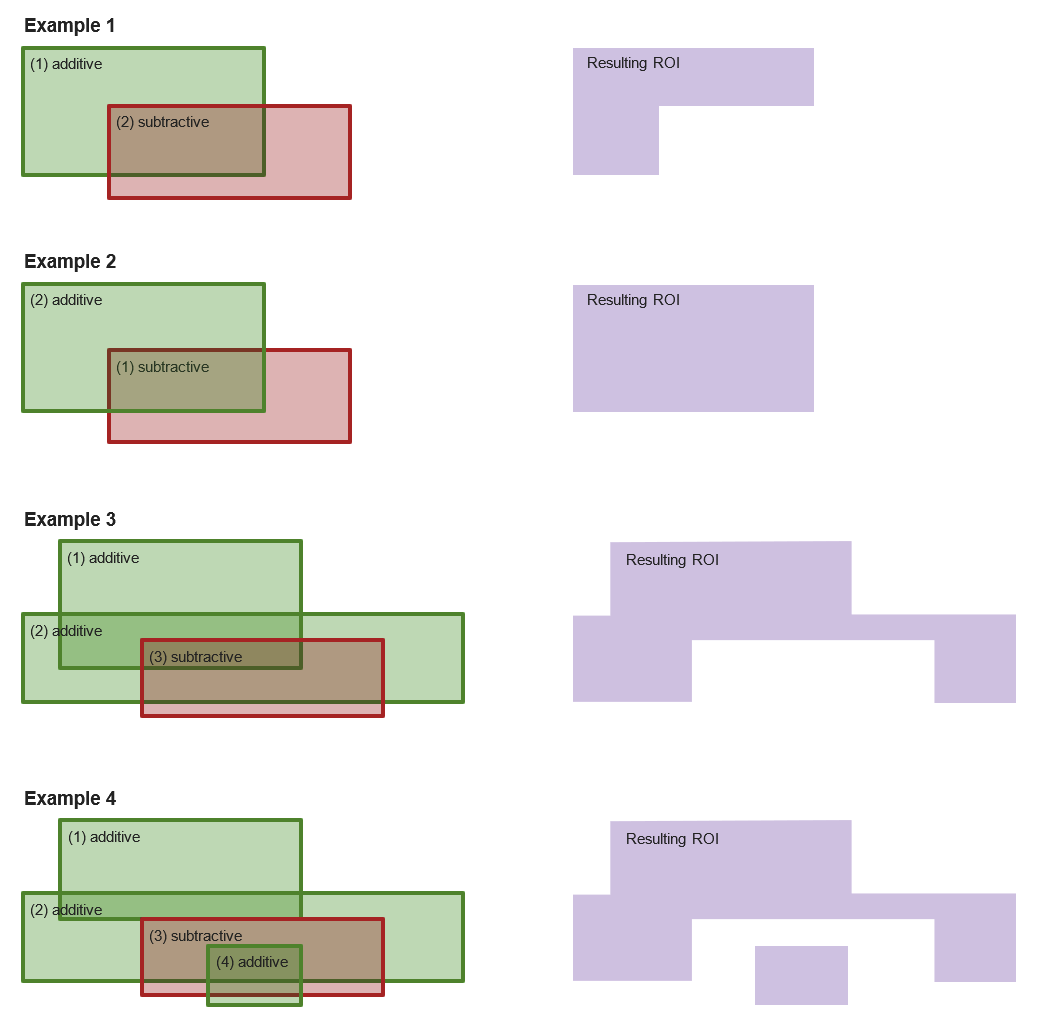
ROI 制图工具的应用顺序
生成的 ROI 区域由各个 ROI 工具的加法或减法区域组成。应用顺序与加法顺序完全一致。
如果摄像机上已经配置了 ROI(请参阅摄像机 ROI),则该 ROI 始终是第一个 ROI。因此可以通过添加或删除新区域来编辑摄像机上的现有 ROI。这既适用于 "模型 ROI",也适用于 "执行 ROI"。
编辑图形时,所选的绘图工具会显示在前面(另请参阅选择ROI 绘图工具)。点击绘图工具旁边的图像,显示的顺序会自动重置为实际应用的顺序。
The Execution ROI (region of interest) defines the area of the image that is taken into account during image evaluation. Results are only searched for in this area, which speeds up evaluation. The Execution ROI is part of the vision function (and therefore of the vision application) and saved in "Dataset" like the models and parameters.
The Execution ROI can be configured with the available ROI tools in the mapp Vision HMI application. The total region for image processing is the result of the individual additive and subtractive ROI tool areas. After applying the configured ROI tools, the resulting Execution ROI area is highlighted in transparent violet.
Fig.: Execution ROI - Displaying the Execution ROI area applied to the camera
Opening edit mode and editing the Execution ROI
Edit mode for the "Execution ROI" is only available in the context of the vision function.
•In the context of the vision function, this means:
•A vision function is selected in drop-down menu "Vision function", not the image acquisition.
•In the main area on the right, tab "Vision function" is active, not "Edit models".
Edit mode for the "Execution ROI" is opened with the following button:
Information:
There is no official way to abort the editing process of the Execution ROI. The Execution ROI is stored in the vision application, however. A stored Execution ROI can thus be restored by reloading the entire vision application.
•Procedure for editing the "Execution ROI"
•Open edit mode for the "Execution ROI".
•Add or remove new subareas using the ROI drawing tools available. Add additive or subtractive geometric shapes, freehand drawing, erasing, etc.
•When using subtractive tools, it is also important to note the Order of application for ROI tools.
•When exiting edit mode, the changes are sent and applied to the camera.
•If the changes were successfully applied, the new resulting Execution ROI is returned and displayed. This can be further edited the next time edit mode is opened.
Information:
An "Execution ROI" that does not contain a single "positive" pixel is invalid and cannot be applied. Edit mode cannot be exited until a valid ROI has been defined.
The "Execution ROI" is created for the image captured with the camera. For this reason, in "Execution ROI" edit mode, only the actual image area can be edited with the ROI drawing tools.
If the vision function inputs OffsetROIX and OffsetROIY are set to values not equal to 0, however, the "Execution ROI" level shifts relative to the image. This makes new areas of the "Execution ROI" level editable. However, areas that could be edited previously will also be locked for editing. This may also cause the entire "Execution ROI" area not to be erased when an image-filling negative ROI tool is applied.
Information:
To delete the entire defined "Execution ROI" area, option "Delete" from the corresponding drop-down menu is used while it is selected. For information about the position, see ROI tools.
The existing "Execution ROI" is selected by clicking on a surface in edit mode that does not contain an ROI tool. When selected, a frame is drawn around the field of view.
•Creating an "Execution ROI" outside the image
•Define the "Execution ROI" area within the image area and exit edit mode.
•Enable the vision function with "Enable".
•Set the input values for "OffsetROIX" and "OffsetROIY" to shift the editable area, for example one times the image width in the x direction.
•Transmit the entered values to the camera with "Execute".
Fig.: Shifting the "Execution ROI" layer to be able to define areas outside the image area as part of the "Execution ROI"
•Open edit mode again and define the next "Execution ROI" area.
•The button marked in the image centers the field of view on the image and the "Execution ROI" area in the "Execution ROI" edit mode.
Fig.: View after shifting the "Execution ROI" level
•A partial area that was initially outside the image area can now be defined as part of the "Execution ROI".
•These steps can be repeated as often as desired. However, it is important to note that saving a larger "Execution ROI" also requires memory on the camera and controller.
•To delete the entire "Execution ROI" area, select it and use the "Delete" button.
Information:
The "Execution ROI" is stored as part of the vision function in the vision application, and the data size of the "Execution ROI" is proportional to the size of the enclosing rectangle around all areas of the "Execution ROI".
If "Execution ROIs" are defined outside the image area, care should therefore be taken to arrange them as compactly as possible.
Overview of available ROI drawing tools and actions
Tool for selecting a single pixel, see Pixel ROI.
•Freehand ROI drawing tools
•Freehand drawing tool (additive)
•Geometric ROI drawing tools
•Circle or ellipses ROI drawing tool
•Commands for multiple selected ROI drawing tools
•Moving to a geometric center line
•Distributing uniformly parallel to the geometric center line
Order of application for ROI drawing tools
The resulting ROI area consists of the additive or subtractive areas of the individual ROI tools. The order of application corresponds exactly to the order of addition.
If an ROI is already configured on the camera (see Camera ROI), this is always the first ROI. An existing ROI on the camera can thus be edited by adding or removing new areas. This applies to "Model ROI" as well as Execution ROI.
While editing the shapes, selected drawing tools are brought to the front (see also Selecting an ROI drawing tool). The displayed order is automatically reset to the actually applied order by clicking on the image next to the drawing tools.